This Gluten Free Baking Mix (Bisquick) recipe comes from my favorite GF CookbookThe Gluten-Free Gourmet: Living Well without Wheat, Revised Edition
. You can read all about how I say that God literally threw this cookbook at me when I needed it most in my GF Brownie Recipe. Keep this mix in a container in your refrigerator. This can be used with any recipe that asks for, or uses Bisquick. I mke a double batch of this when I make it. It ends up making about a gallon when I double it and lasts me for a long time.

Of course, you can always just buy GF baking mixes, like GF Bisquick, but they’re much more expensive than making your own. However, it is much more convenient and tastes oh so much better, too! Bisquick Pancake and Baking Mix, Gluten-Free,


Want to make “regular” Bisquick? Head over to Practically Virtuous.

This month the Dishing It Up crew is offering you a great collection of recipes that require five ingredients or less. Some of us may fudge a little by saying that some things are optional, but those will be the ingredients that are exactly that optional.
![]()
![]()
Gluten Free Baking Mix
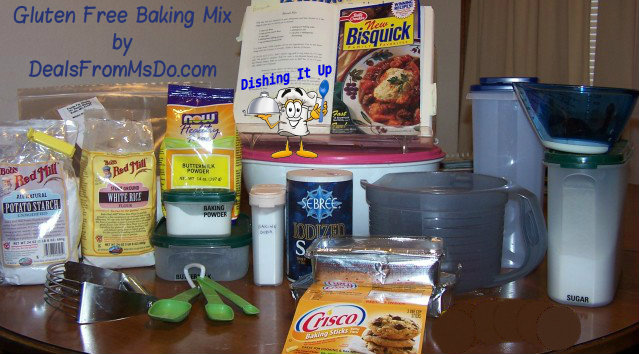
- 3 cups rice flour
- 2 cups potato starch flour
- ⅓ cup sugar
- 4 tablespoons baking powder
- 1 tablespoon baking soda
- 1 tablespoon salt
- 1 cup powdered buttermilk
- 1 cup plus 2 tablespoons shortening (I prefer Butter Flavor Crisco Sticks)
- These are basic Gluten-Free (GF) staples in my household. I order them from Vitacost to get them at the BEST prices possible, which is much lower than I can get them locally!
- When measuring small dry ingredients, dip the measuring spoon (NOT a spoon that you eat with) into the container and pull out a heaping measure.

- Use the straight edge of a butter knife to scrape the rounded portion back into the container. Do NOT pack the dry ingredient down into the measuring spoon. It should be measured loosely.

- Larger quantities of dry ingredients should be measured in a scoopaple measuring cup following steps 1 and 2 above. However, since I was using large quantities of dry ingredients, I measured them in the larger measuring bowl on the left and shook the bowl slightly to level. Smaller measuring cups like the one on the right are intended for measuring liquids which automatically level.

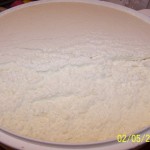
- Each of the dry ingredients has their own color and texture. Dumping each into a different area helps me keep track of which items have been added to the bowl. I use a "That's a Bowl" from Tupperware. Blend together all the dry ingredients.

- I prefer to use Butter Flavored Crisco Sticks for this recipe. If gives everything more flavor and the labels are marked with all of the appropriate measurements.
- The whole chunk of Crisco can be added to the bowl, but it creates a LOT more work later. Instead, I unwrap the stick and cut it into slices. Then I cut the slices into smaller cubes.


- Add the shortening to the bowl of dry ingredients. There is no need to separate each cube. As each cube is coated with flour and blended, they will break down.

- Cut in the shortening till the mixture is crumbly. A pastry blender is really needed to help you blend everything together and to help cut the shortening into the dry ingredients. Since GF flours are so much heavier, they don't blend together as easily as regular wheat flour.

- When you think all of the shortening has been cut into the flour mixture, stick your hands in. Feel around. You might find a few more clumps of the Crisco. Bring them to the top and repeat step 7.

- Very small clumps will remain, unless you spend HOURS cutting the Crisco into the flour mixture. I have tried using food processors, blenders, and mixtures. GF flours are generally too heavy to handle. The motors aren't heavy duty enough.

- The final product will look much different than traditional Bisquick. Don't worry about trying to cut in every single, TINY clump of Crisco.

- I made a double batch.and store it on the top shelf of my refrigerator in Tupperware Cereal Containers. GF grains aren't as stable in your pantry as other flours. They may also be stored in the freezer for longer term storage. I also leave the measuring scoop inside the container so that it's always handy. The plastic bag is my leftovers from my previous batch.

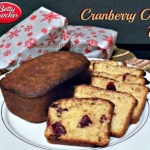
Check out some of my Dishing It Up recipes that I’ve used this gluten free baking mix to make:
- Corn Casserole
- Pizza Pie with Gluten Free Subs
- Cornbread Dressing and Gluten Free Subs
- Impossibly Easy Cheeseburger Pie and Gluten Free Subs
I also have a mix that I use in place of regular flour in recipes. It can be found at the bottom of my recipe for Corn and Cheddar Waffles Go Great With Soup
When I use this gluten free baking mix in recipes, I always use milk in place of water. I also add about about a teasppoon or two of vinegar. This is one of those science thing.  It activates the baking soda giving the “rise” when it bakes. Don’t let the wet mix sit in your mixing bowl once mixed. It will rise in the bowl instead of your baking dish.
TO MAKE BISCUITS: Add 1 beaten egg and 1/4 cup water to 2 cups mix.(add 3/4 teaspoons xanthan gum per cup of flour) Stir gently to moisten. Roll out onto a gf floured board and cut into biscuit shapes. Bake in preheated oven at 400 degrees for 12 to 15 minutes. Makes 8-10 biscuits.
TO TOP COOK FOR STEWS OF CHICKEN PIES: Add 1 beaten egg and 1/3 cup water to 1 1/4 cups mix. Stir to moisten and drop by spoonfuls on the hot stew or pie. Bake at about 350 degrees for 20-25 minutes, or until the biscuits are done.


Speak Your Mind